Getting Started
This page will guide you through the essential first steps: installing the Boltic CLI, creating an integration, and generating a boilerplate — so you can begin building integrations tailored to your needs.
Watch the video below for a comprehensive demonstration of the Boltic CLI process from installation to workflow deployment.
In this video, you'll learn:
- Key integration concepts such as triggers and activities
- The prerequisites before building an integration
- The prerequisites before installing the Boltic CLI
- How to install the Boltic CLI
- How to create an integration with a use0case
- How to use components within your integration
Use this video as a supplement to the written steps below for a complete understanding of the Boltic workflow process.
Prerequisite
Before you begin working with Boltic’s cloud services and APIs, ensure the following requirements are met:
- Node.js v18 or later
- You must have a Boltic account to access Boltic's cloud services and APIs.
- Familiarity with REST APIs is essential, particularly regarding how authentication works (e.g., API keys or OAuth) and how to manipulate data.
- Familiarity with form components such as text inputs, number fields, and checkboxes. These are fundamental for designing data fields that accurately process incoming data types. Refer to Components to learn more.
- Access to relevant documentation. If you plan to implement a specific activity (e.g., for Freshsales), ensure you have the necessary documentation, such as the Create Account API. This documentation typically includes API endpoints, required headers, and example request bodies.
- If you integrate with external services (e.g., Freshsales), ensure you have the corresponding API documentation readily available. This generally includes:
- Endpoint URLs
- Required headers and authentication schemes
- Sample request/response formats
Install Boltic CLI
The Boltic CLI simplifies workflow integration development using commands for creating, testing, and deploying projects.
- Run the following commands to install the Boltic CLI:
npm install -g @boltic/cli
Generate a Boilerplate
Follow the steps below to generate a boilerplate for your Boltic integration workflows:
- Run the following command to log on to your Boltic account:
boltic login
This command will open a browser window prompting you to log in to your Boltic account. After logging in successfully, the CLI will securely store the authentication token locally. Refer to Authenticate the Boltic CLI
A success page will appear once you’ve logged in successfully.
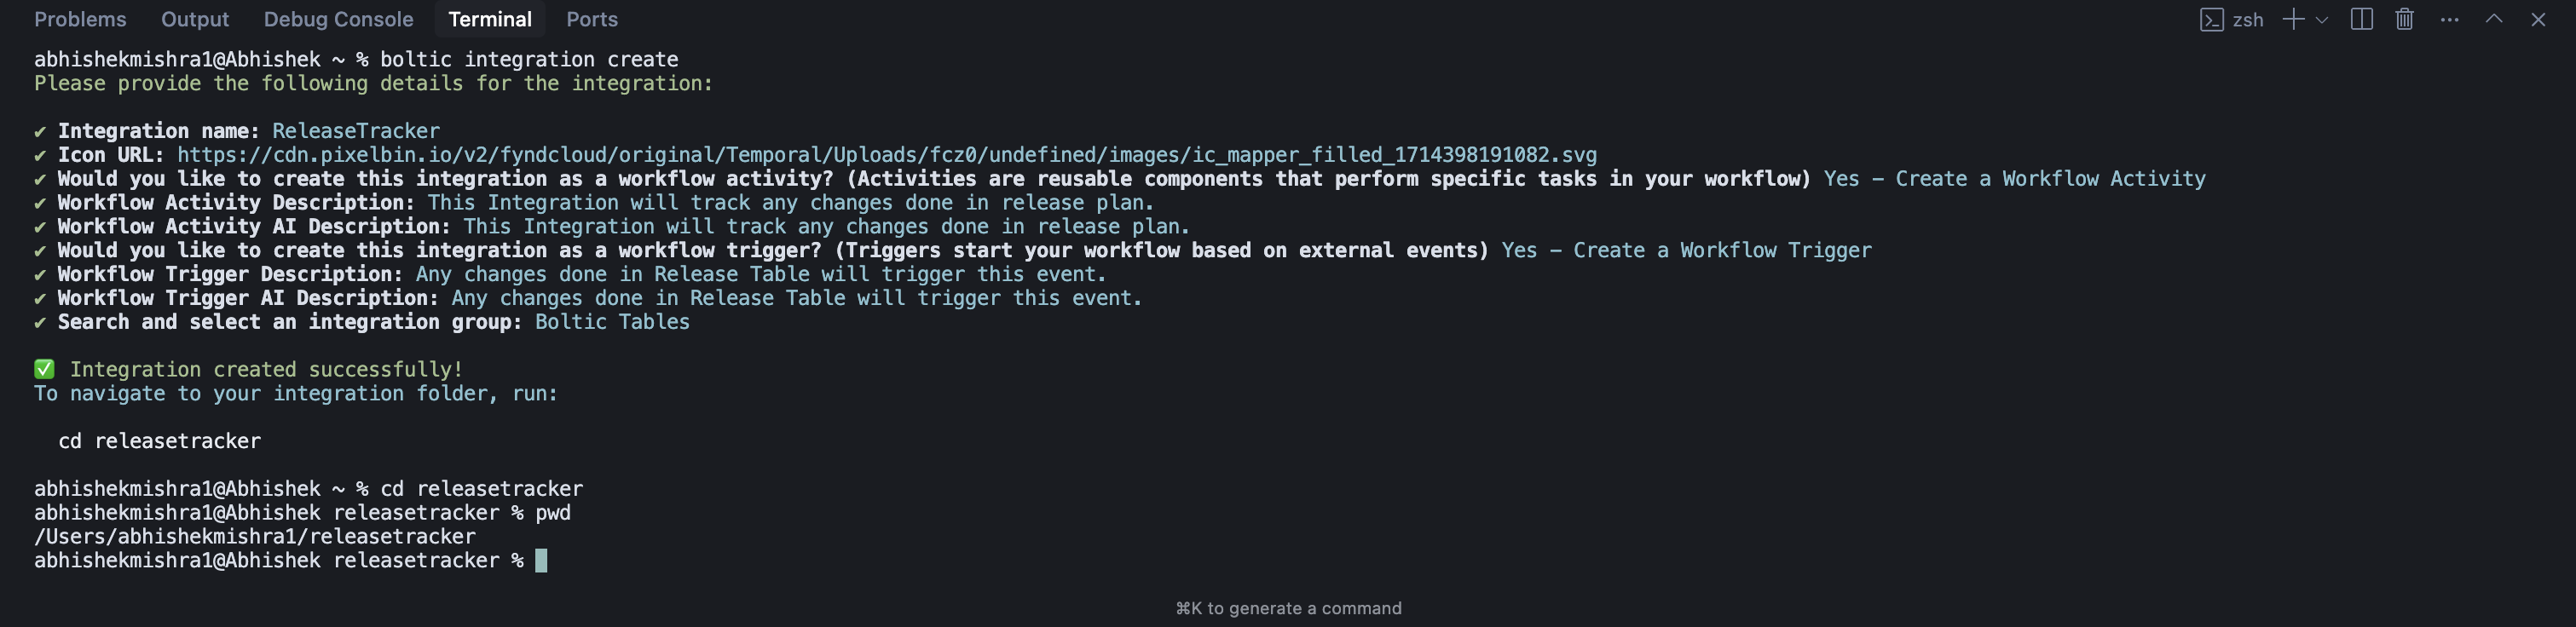
- Run the following command to create an integration:
boltic integration create
-
Provide a name for the integration.
-
Provide a CDN URL for your integration icon in SVG format if you want to change it. If no URL is provided, a default icon will be used.
You must select at least one option as Yes—either Activity Integration (step-5) or Trigger Integration (step-6) when creating a Boltic integration workflow.
Choosing No for both options is not allowed, as the integration would have no functional purpose without an activity or a trigger.
- Choose whether to create an activity integration. Activity Integrations are reusable components that perform specific tasks in your workflow:
- If yes, enter a description for the AI integration.
- If no, continue to the next step.
- Choose an option to create a trigger integration. Triggers start your workflow based on external events.
- If yes, enter a description for the AI trigger.
- If no, continue to the next step.
- Select an appropriate integration group from the available options (e.g., serverless, Freshsales, and Google Workplace). You will get a success message when the integration is created.
You've successfully created and launched your first Boltic Integration. You can now begin customizing your integration by editing schema files, defining resources, and building workflow logic.
Credential Protection and Authentication
Before you start using the Boltic CLI to create or manage integrations, you'll need to authenticate it with your Boltic account.
The Boltic CLI securely stores the following credentials:
- Token: Bearer token used for API authentication.
- Session: A session cookie is used for web requests.
- Account ID: Your unique Boltic account identifier.
Authentication Flow
The boltic login command in your terminal will initiate the authentication process. The authentication process follows these steps:
- The CLI automatically opens your default browser to the Boltic login page.
- OAuth Flow completes the authentication in your browser.
- The CLI automatically exchanges the authorization code received for access tokens.
- Tokens are encrypted and securely stored using your system's native keychain:
- MacOS: Keychain Access
- Windows: Credential Manager
- Linux: Secret Service API
- To check your current authentication status, run:
boltic integration list
Log out and Token Management
- To clear all stored authentication credentials, run:
boltic logout